
Resin blank info for finished masks and other
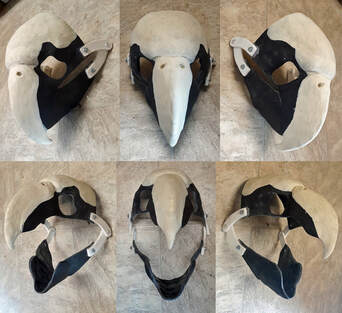
We cast our bases with SpecialtyResin brand polyurethane resin in 4 different types. Bright white, offwhite fill, color-pro translucent resin for colored items, and Black.
All of our finished masks are priced for a moving jaw. All of them. We do not make non moving jaw masks!
We cast our own sculpt and molded hinges out of the same resin we cast the resin blanks with!
Before attaching pre-setup hinges, We cut the rear edge of each blank with a dremel blade for smoothness.
We cut all jaws open after we have arranged/glued the hinges first, to guarantee a correct opening and closing.
We bolt the hinges to the blanks with one bolt each after gluing them with heavy duty hot glue.
We do not incorporate silicone noses in our bases anymore. We can however use Flex foam it 17 soft but firm expanding foam to make a nose that squishes!
We cast most regular bases in black resin on the inside and white resin on the outer surface! Many times we cast noses in the color they need (most of the time black) Or beaks in the color they need to be!
EYES
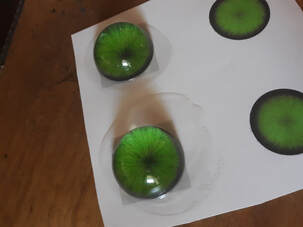
We can use a few different eye base types. The most popular is a perfectly half round acrylic eye base and these make "follow" eyes best. We can also use glass cabochons that are much more flat and do not follow , but can make for the right look on an animal that doesn't have quite as rounded eyes!
delviesplastics.com is where I purchase all of my acrylic halfround cabochons (follow eyes) Glass blanks are ordered in bulk from many different suppliers. WE DO NOT CAST OUR OWN EYE BLANKS!
For eye images, I create them in photoshop, print them and then using E6000, glue them to the backs of eye blanks! It takes a total of 24 hours for a pair of eyes to be dry and usable without high risk of the image pulling off slightly leaving horrible glares in the image.
we like to do a two piece gluing set for the eye patterns. Where we print out two of each eye pattern, and glue them both onto the blank one behind the other. It gives an awesome fuller color effect. and if we print one with slightly different contrast or pattern than the top layer it looks extra deep in design!
Insides, and preparation of masks
Padding the blank
For padding, (which is a panel in the forehead and a panel behind the jawset on the chin area) we use thinner foam with a soft cotton,spandex covering over the foam! It's soft, nice and not scratchy like some foams tend to be. We do NOT line full heads with fabric. Only the padding pieces are lined!
Top jaw pieces.
We RARELY include top jawsets in finished masks unless they are required for an aesthetic look, such as a snarling wolf or a creature with large jutting teeth. they are normally unnecessary and constrict the air flow. We CAN include a top jaw if you feel you MUST have one. Please specify during your project as we will normally omit the top teeth! Airflow is more important than a jaw piece that most won't even see. And you will appreciate it during wear.
We do not include fans off the bat. If you would like a fan installed into your suit let us know and that will be added to the project cost. We can order one from Dreamvisioncreations or another supplier.
Vision Ports
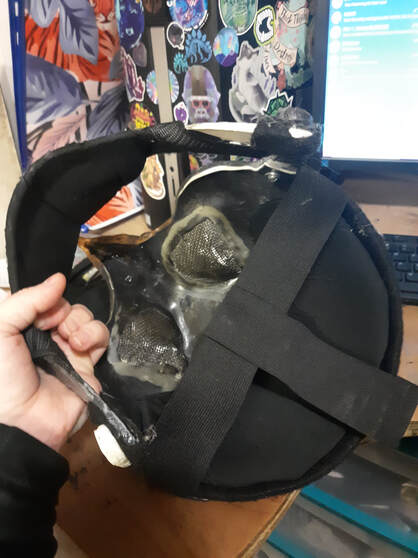
We most often use vinyl aida plastic mesh for our vision ports. Depending on the base the vision is normally pretty good! Sometimes we use fine black mesh as well. The vinyl aida gets painted to match the face color as often times the vision ports are larger than a tear duct!
blank edging/ softness
All rear edges are lined with felt or fleece. While we also dremel cut the backs of each blank to be a smooth line. Added edging is also very important. We also add felt/fleece panels on the backs of the inside of the mouth. So there is no pinching when the jaw opens and closes! We also like to add a little felt piece between the bolts of the hinges that wraps around the inside of the hinge and covers the bolt so that your hair doesn't get stuck in the bolt!
moving jaws/ spring
"Springloaded" hinges are done with medium thickness elastic. We attach the elastic from the bottom jaw, around and through the hinge area connected to the upper part of the outside of the base. With some slack, it has the strength to close itself when you open your mouth!
Padding the blank
For padding, (which is a panel in the forehead and a panel behind the jawset on the chin area) we use thinner foam with a soft cotton,spandex covering over the foam! It's soft, nice and not scratchy like some foams tend to be. We do NOT line full heads with fabric. Only the padding pieces are lined!
Top jaw pieces.
We RARELY include top jawsets in finished masks unless they are required for an aesthetic look, such as a snarling wolf or a creature with large jutting teeth. they are normally unnecessary and constrict the air flow. We CAN include a top jaw if you feel you MUST have one. Please specify during your project as we will normally omit the top teeth! Airflow is more important than a jaw piece that most won't even see. And you will appreciate it during wear.
We do not include fans off the bat. If you would like a fan installed into your suit let us know and that will be added to the project cost. We can order one from Dreamvisioncreations or another supplier.
Vision Ports
We most often use vinyl aida plastic mesh for our vision ports. Depending on the base the vision is normally pretty good! Sometimes we use fine black mesh as well. The vinyl aida gets painted to match the face color as often times the vision ports are larger than a tear duct!
blank edging/ softness
All rear edges are lined with felt or fleece. While we also dremel cut the backs of each blank to be a smooth line. Added edging is also very important. We also add felt/fleece panels on the backs of the inside of the mouth. So there is no pinching when the jaw opens and closes! We also like to add a little felt piece between the bolts of the hinges that wraps around the inside of the hinge and covers the bolt so that your hair doesn't get stuck in the bolt!
moving jaws/ spring
"Springloaded" hinges are done with medium thickness elastic. We attach the elastic from the bottom jaw, around and through the hinge area connected to the upper part of the outside of the base. With some slack, it has the strength to close itself when you open your mouth!
Patterns!
We have monster makers mannequin busts that we use for patterns! When we make a head,we make the full face AND hood all in one piece with a half pattern style. we always use zippers for this reason. as the hoods are more full head fit and get smaller around the neck area.
Almost each and every pattern piece is made custom for the new commission. Including ear patterns, tails, and of course everything else that is custom sized. Some patterns that could potentially be reused often, we have to re-pattern anyhow. Most things we create for you are fully custom.
for heads, we prefer to make a pattern with a tiny bit of wiggle room in the fur area. The elastic strap inside the head should be tight enough. we don't feel as comfortable making tight fur hoods as they can get frustrating to zip. Most of the time you can pull your mask off without unzipping, which is great if you need a breather and just need to get out of the suit.

EARS
Our ears are designed and cut from "Fosshape" heat firming felt . It shrinks about 20% in size when heated and stiffens but doesn't stay too stiff!
To fabricate our ears, we glue fur or fleece to the ear in just a way to make it look realistic and slender. And shave down as much as we can to get the right ear look for the right animal depending.
Ears are finished and sewn into the hood/face pattern after the fur pattern is attached to the resin blank! That way they can be positioned just right for the perfect realistic anatomy! They are sewn on with upholstery thread!
(Painting)
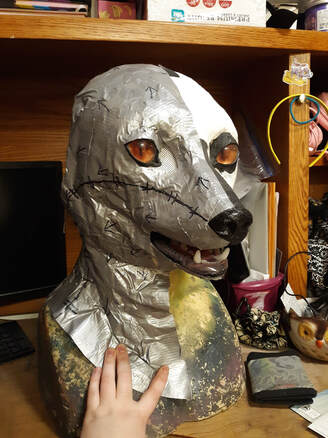
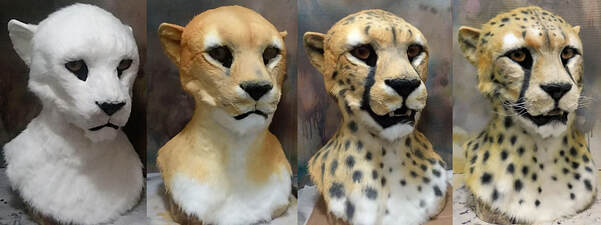
Sometimes we will sew markings but most times we will airbrush them. We can talk about details of that and what works best for the design. More hyper realistic items look best airbrushed and that is what we prefer to do. Many times we will use base colored fur and blend colors from that. The example photo is one where we fully painted the coloration to get a supremely realistic look!
To airbrush, we use acrylic paints watered down, (from various brands), and sometimes, rarely, createx airbrush paints.
After airbrushing a first round we often brush out the fur and then touch up colors 1 to 6 times further to make sure the color is good, and the fur is brushable. The fur texture will be a little dry after airbrushing. this is to be expected and it's worth it for the right look in the end!
We almost always add shading details to bring out prominent features in masks. such as cheekbones, brows etc. Some might say that since it's already a full 3D item, no shading should be needed. But I beg to differ.I find it to add a lot of pop to the design and character!
If your paint job happens to fade over time (We haven't gotten a complaint yet) We would love to do an airbrush touch up for you for your suit made by us for the cost of shipping!
